How To Make A Flannel Burpcloth
by Monika of Oma's Place

Cut: White flannel 11.5" x 18" (cut 2)
Colored flannel 13.5" x 18" (cut 1)
For top and bottom borders:
Contrasting fabric (flannel or otherwise)
5.0" x 14" (cut 1)
2.5" x 14" (cut 1)
* If you would like to add fabric trim peeking out from underneath the borders, cut (2) 2" strips of fabric (width of fabric) , fold in half, iron and place underneath seams.
Directions:
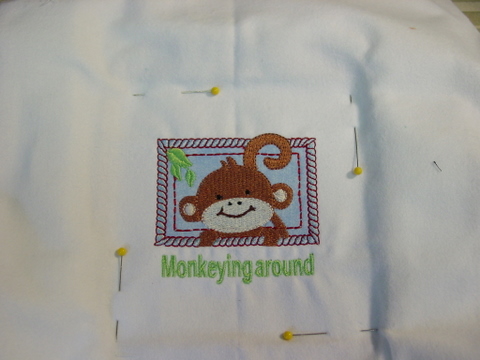
1. Embroider the design of your choice in the center of one of the white
flannel panels (11.5"x18"). Place the center of the design about 5-6"
up from the bottom of the panel. Use medium weight tearaway
stabilizer, spray with adhesive spray and place the flannel on top,
securing it with straight pins along the perimeter of the hoop.
2. Remove stabilizer from the back of the embroidered design where
possible.
3. Press this panel using spray sizing.
4. Turn the embroidered panel over and fold the long edges til they
meet in the middle.
5. Mark the center of the second piece of flannel by placing a long
mark down the center, using a pen with disappearing ink. Or you
could just fold over the piece of fabric lengthwise and press with an
iron so that it will leave a center mark.
6. Now match up the center of the first embroidered panel with the
center of the second panel.
7. If desired: Place a folded over 2" piece of fabric trim under the edge
of the top panel and pin onto the non embroidered panel, making
sure that the top panel remains properly centered.

8. Now, sew this center (embroidered) panel to the non embroidered
flannel piece. You can use a decorative stitch to do this. The triple
elastic or the blanket stitch make the top stitch more noticeable and
are very attractive. 
9. Take the slightly larger piece of colored flannel and place it RST on
top of the white flannel, matching long edges. (The colored piece is
slightly bigger so that when you will turn the fabric inside out, there is
a little colorful border on the front of the burp.)

10. Sew along the edge, a ¼” seam. I serge it ,but it doesn’t have to be
since it’s going to be on the inside of the burp pad.
11. Sew the other edge.
12. Turn this “fabric tube” right side out and iron the “tube”. 

13. Even out the top and bottom edges by rotary trimming. 
14. Mark a line 1 ½ “ up from the lower edge of the burp pad. 
15. Place the 4.5" x 13" border piece RST on top of the white flannel, just at or slightly above the marked line.

16. Sew these pieces together, again using a ¼ “ seam allowance. 
17. Now, turn the border fabric to the back of the burp, folding under ½ “
or so along the edge.

18. Iron the band, press.
19. Now, take the folded and pressed edge and fold it over to the front,
so that the band will be facing RST.
20. Stitch close to the edge of the band and then trim seam and corner.
21. Now turn the band right side out.

22. Slip stitch in place or top stitch by machine. I much prefer to slip stitch. It’s much neater and it really is only a very short hem.
23. Now, for the other side, repeat the process. Don’t mark the
fabric, though. Just place the border RST against the burp edge and
sew a ¼ - 1/2" seam.
24. Turn the border fabric over to the backside of the burp, folding under
the edge as shown.
25. Fold it back all the way, iron, stitch close to the edge as before, trim
seams, and turn border right side out.
26. Finish by slip stitching, ironing.

E N J O Y!